Tuesday, September 7, 2010

Fall Fun!

This month my task was to create a card based on the sketch below, using the new Autumn/Fall stamps from Serendipity!


So I took the sketch just like it was and whipped up this card! Isn't the Autumn stamp adorable!


Supplies:
~ Autumn Serendipity Stamp (1223H)
~ Brown ink
~ Fall Patterned Paper
~ Coordinating cardstocks
~ Colored pencils
~ felt leaves
~ velvet or felt ribbon

Directions:
1. Cut patterned paper to 4 1/4" x 5 1/2". Cut brown strip to 3 1/4" x 5 1/2" and adhere in center of patterned paper. Cut off white cardstock to 3"x 4 1/2", cover with felt leaves and trim of excess leaves, adhere to top center of brown strip.

2. Stamp image in brown, color with colored pencils and cut out! Using pop dots adhere over top of leaves. Add ribbon to edge. Super simple!

But I couldn't be done there not when that adorable spider was still calling out my name! So I created this one as well. Enjoy!


Cute and glittery too!

Now hop on and check out the other awesome projects! I'm sure you'll be inspired.


Anya's Blog

Lynda's Blog

Kathie's Blog

And for the rest of this year we have a special guest designer Jenny, check out her blog below!

Jenny's Blog


And as always check the new contest at Serendipitystamps.com and don't forget to sign up for the newsletter to get those awesome deals!

Monday, August 30, 2010

Spooooky....

When Mary emailed us and asked us all for ideas for the new fall line, I jumped right in and suggested a cutesy spider. Now this coming from a girl who is terrified of spiders might be a bit of a surprise, but when you make them super cute, I'm sucked in. So much to my great delight when the new stamps arrived on my doorstep a cutsey spider was included!

I also happened to be shopping at AC Moore on Saturday and came across this small carvable pumpkin, I'd seen big ones before, but never a little one. I just knew that it and the spider stamp went together.


Imagine I had an idea of something a bit spookier but how could this little guy ever be scary? No way! And of course I started out thinking just the spider inside and some ribbon and it spiraled out of control!


The little boo stamp also comes in the set with the spider I used my xacto knife to make thin slits to stick the transparency into. I also stamped the spider on transparency with staz-on, and colored on the back of the image with galaxy markers that don't smear on shiny surfaces.


Plenty of coloring on the pumpkin and added ribbons with cute Halloween buttons finish the look!

Tuesday, August 24, 2010

Oh Baby!!

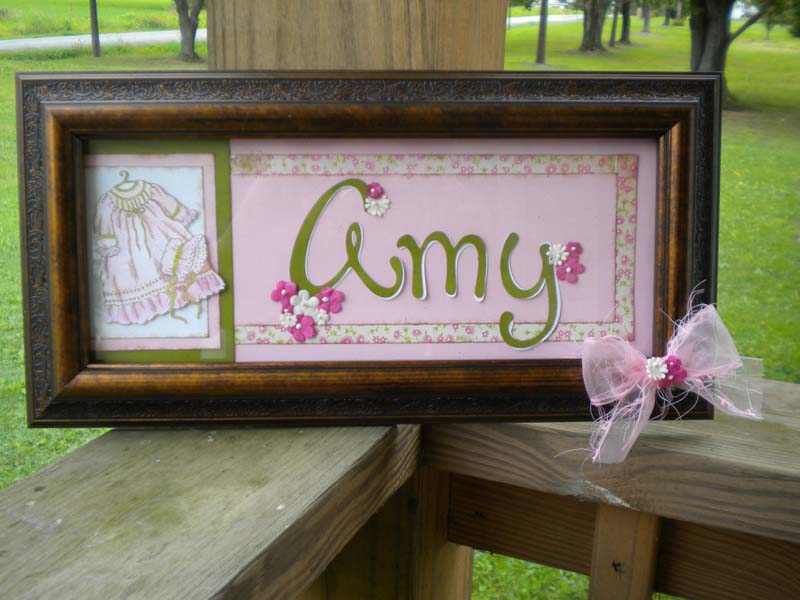
Serendipity's second August Challenge has arrived! This month we are highlighting some of the beautiful baby stamps that Serendipity has available!


Isn't that frame adorable... I just love to use them, and love it even better that they are only $3 at Walmart. I could have picked any name, but well I admit that I like seeing my name on things so I went ahead and used it!

Supplies:

* Christening Gown Stamp (627H) From Serendipity Stamps
* 6" x 12" frame
* Coordinating papers
* Coordinating letter stickers or die cuts ( I used Lyrical Letters on the Cricut)
* Brown Ink
* Colored Pencils
* Gamsol and stump for blending
* Paper flowers
* Ribbon

Directions:

* Cut pieces to fit into frame, each frame is a little different so you may need to play with the sizes a bit. Ink edges of all pieces.
* Stamp image in brown ink and color with colored pencils, blending with Gamsol for a smooth look.
* Adhere letters to center square.
* Embellish letters with flowers.
* Adhere bow to outside of frame, and add flowers to it as well!


Here is a close up of the adorable little dress!


Now for the other goodies this month check out the other Designers Blogs...


Anya's Blog

Lynda's Blog

Kathie's Blog

And for the rest of this year we have a special guest designer Jenny, check out her blog below!

Jenny's Blog


And as always check the new contest at Serendipitystamps.com and don't forget to sign up for the newsletter to get those awesome deals!

Tuesday, August 17, 2010

Gotta scrap those pictures...


Seems like lately all I've been doing is making cards or projects but doing very little actual scrapbooking of my photos... so I hit the scrap room with Disney photos in hand.... I love how this page turned out but it makes me a bit sad because it reminds me of all the great topiary pictures on the lost memory card... :(


This layout uses the zipadee line from Close To My Heart! Enjoy! Maybe the faster I get my last Disney pictures scrapped the sooner I can go back?

Tuesday, August 10, 2010

Write on...

Serendipity's first challenge this month was to use stamps that showed writing.... not hard since they have a great selection of stamps to choose from in that category... but I fell in love with the Feather Pen (192D), it's so swirly and elegant looking.

And since having a few teacher friends and a few friends who are avid journal writers I thought I'd make up a card that was also a gift.

Here's my card.. it was super simple, would make such great writing prizes or just a gift from the teacher, and would be great in so many color schemes, school colors, holiday colors, or favorite colors.


Supplies:
Feather Pen Serendipity Stamp (192D)
Three coordinating pens
Three colors of cardstock to match pens
Coordinating Ink
White or other coordinating letter stickers

Directions:
* Cut card base to 4"x4" make two mats in coordinating colors.
* Cut a strip of paper to go around pens whatever size you need to hold pens you choose... Glue three colored strips together and score into a box, and adhere to card front.
* Stamp feather pen and cut out. Adhere to top of pen holder.
* Use letter stickers to spell out Write on.


Now for the other goodies this month check out the other Designers Blogs...


Anya's Blog

Lynda's Blog

Kathie's Blog

And for the rest of this year we have a special guest designer Jenny, check out her blog below!

Jenny's Blog


And as always check the new contest at Serendipitystamps.com and don't forget to sign up for the newsletter to get those awesome deals!

Tuesday, July 27, 2010

Christmas in July!

Christmas in July! Our challenge for this month was to take a non Christmas image and make into a Christmas card! I had a lot of fun with this one! I took the chipmunk and wiped the part of the stamp with the daffodil clean. Then covered it with a red flower that I thought looked like a poinsettia. Then added white embossing powder around to look like snow!

Supplies:
Chipmunk Cling set (1201QCL)
Merry Christmas Casual Small (668C)
Red, White, and Green Cardstock
Black and Red ink
Green and white pens
Brown shades of Copic markers
Red paper flower
Green jewel
Green Ribbon
Emobssing pen and gun
white embossing powder

Directions:
1. Cut card front from red to 4 1/4 x 5 1/2
2. Stamp chipmunk in black, I used a paper towel to wipe off the daffodil the chipmunk was holding. Color with markers. Cut into ciricle.
3. Cut scalloped circle out of green (I used nesties dies) add white dots to all scallops.
4. Using embossing pen add snow to the grass, leaf, and end of chipmunks nose.
5. Add snow to red flower and ahdere to card with green jewel center.
6. Tie ribbon around top of card. Stamp Merry Christmas in Red on small tag and attach under bow.
7. Add doodles to edge of card and tag!


Now for the other goodies this month check out the other Designers Blogs...


Anya's Blog

Lynda's Blog

Kathie's Blog

And for the rest of this year we have a special guest designer Jenny, check out her blog below!

Jenny's Blog


And as always check the new contest at Serendipitystamps.com and don't forget to sign up for the newsletter to get those awesome deals!

Wednesday, July 21, 2010

A trip in the way back machine....

For our first July Challenge Mary asked us to pick a stamp from one of her early lines. Once I saw this pile of books I knew that was the one I wanted to use.


This is a big card... 5 1/2 x 8 1/2 since I don't usually make big cards I was surprised at how much I liked it big. Lots of room to play with the big stamps.

Supplies:

Books Stamp set (063QCL)
Brown Cardstock
Yellow/Green pattern paper
Pattern Paper that looks like ledger paper
Brown Ribbon
Brown ink
Bronze Brads
Bronze glitter
Border punch (mine is from Fiskars)

Directions:

* Cut Brown cardstock to 5 1/2 x 8 1/2
* Cut Pattern Paper 1/2 inch smaller all around
* Border punch bottom of Pattern paper and a strip of brown cardstock, and another strip of pattern paper, adhere to back of big pattern paper.
* Ink edges in brown adhere to cardstock
* Stamp both stamps from set on ledger paper in brown ink.
* Ink edges and middles to give a worn appearance.
* Adhere to front of card with brads.
* Tie ribbon across card add double bow.
* Glitter around pattern paper and in holes of bottom punch.
* Adhere to card front!


Now for the other goodies this month check out the other Designers Blogs...


Anya's Blog

Lynda's Blog

Kathie's Blog

And for the rest of this year we have a special guest designer Jenny, check out her blog below!

Jenny's Blog


And as always check the new contest at Serendipitystamps.com and don't forget to sign up for the newsletter to get those awesome deals!